
Last time, we looked at Azure Front Door being used as a reverse proxy in front of Azure App Service.
We are going to increase the difficulty level today by looking at how to implement Azure AD authentication(also called easy auth) in Azure App Service behind Azure Front Door.
Although that seems like an incremental step, there are quite a few challenges due to the multi-tenant nature of Azure App Service. Basically, if we simply enabled authentication on the web app, the app will go to Azure AD for authentication and come back to the Web App URL, not Azure Front Door URL. This would of course break the reverse proxy nature of the solution.
In order to do this, we’ll need a custom domain name, hence our own DNS.
If you prefer official documentation to my blog, there is some online documentation of this solution around Azure Application Gateway.
As usual, code is in GitHub.
The problem
The problem is quite simple when we think of it.
Azure App Service is a multi tenant service. This means it hosts several tenants under the same public IP. The way it’s able to route web requests to the proper App Service cluster (tenant) is via the HTTP Host Header.
Let’s take an example.
When Azure Front Door exposes an endpoint at https://fd-auth.vplauzon.com.azurefd.net, it forwards it to https://vpl-wa-auth.azurewebsites.net. When Azure App Service receives the requests, it opens the headers and see the host is vpl-wa-auth.azurewebsites.net, which is mapped to our web app.
Now, if we activate Easy Auth with Azure AD, it automatically uses the host header to build its “reply URL”, i.e. the URL where Azure AD will post the authentication token. This is why it breaks the reverse proxy.
The solution
First thing we’ll do is use an empty host header when we configure the backend in Azure Front Door. Front Door then defaults the back-end host header to the one in the front-end request.
In order for this to work, Azure App Service would need to be able to map fd-auth.vplauzon.com.azurefd.net to our Web App. We can do that by adding it as a custom domain… but it wouldn’t work since to validate the domain Azure App Service checks for a CNAME in the DNS of the domain. Since we do not own azurefd.net, we’ll need a custom domain we own.
In the example, we’ll use vplauzon.com, which we happened to own.
There is a bit of a hack here since to register a custom domain, we’ll need to configure the DNS to point the CNAME at Azure App Service but to register the front end in Azure Front Door, we’ll need to point the DNS at Azure Front Door. This is only required for registration though.
Deploying the solution
Before we deploy the solution, we’ll need to configure our DNS since Azure Front Door will register the front end with it. Let’s first review the parameters of the ARM Template. There are five.
| Parameter | Mandatory | Value used in this article | Description |
|---|---|---|---|
| customDomain | X | fd-auth.vplauzon.com | The custom domain we are going to use for our front end |
| frontDoorHostPrefix | X | vpl-fd-auth | The DNS prefix for the default front door domain name (in the diagram, that is the ‘X’ variable) |
| webAppName | X | vpl-wa-auth | The name of the web app, also DNS prefix for its default domain name (in the diagram, the ‘Y’ variable) |
| webAppSKU | Sku of the web app (actually App Service): Free, Shared, Basic or Standard. Default to Standard because life is too short. | ||
| workerSize | Size of the App Service: 0 (small), 1(medium), 2(large). Default to 0 because we won’t deploy a real web app. |
So in our case, we need to create a CNAME entry mapping the sub domain fd-auth to the domain vpl-fd-auth.azurefd.net. In Azure DNS Zone, it is done as follow:
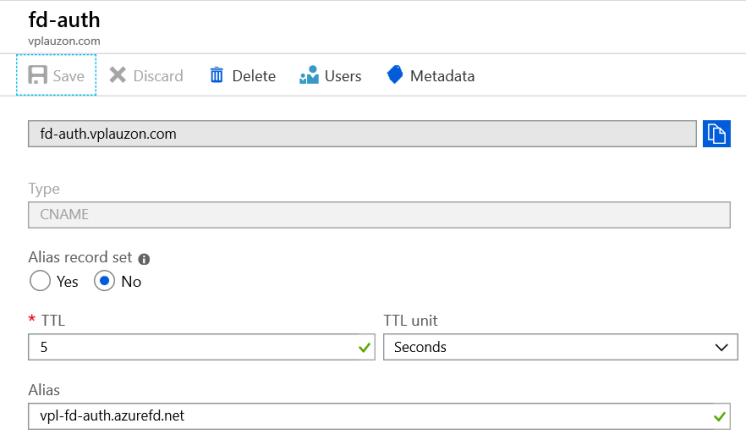
Once we saved that record, we are ready to deploy the template.

Looking at the solution
Let’s look at what was deployed.
Like last time, we have three resources: an Azure Front Door, an App Service plan & an App Service.
Let’s open the Azure Front Door and look at its designer.

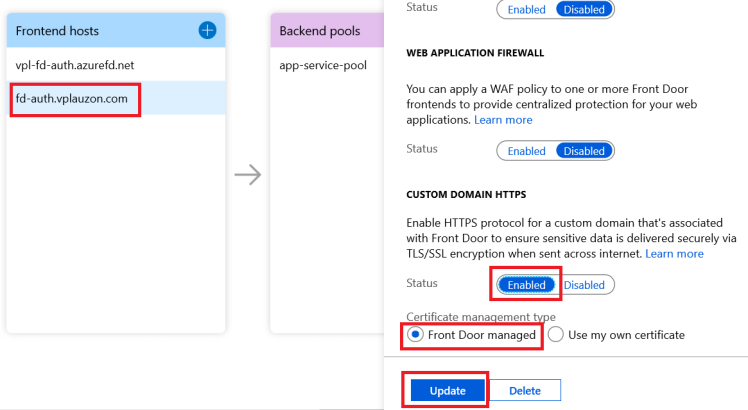
We can see we have two frontend hosts. The default one, i.e. vpl-fd-auth.vplauzon.com.azurefd.net and the custom one, i.e. fd-auth.vplauzon.com.
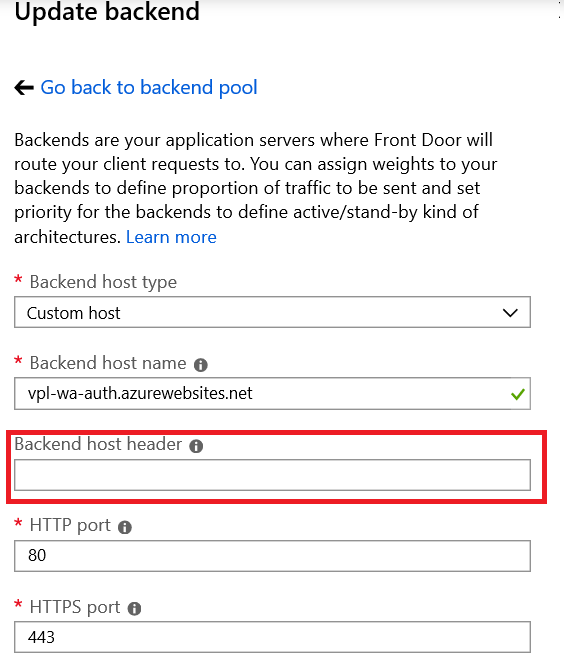
If we open the backend pool app-service-pool, we should see it has one host name, i.e. the Azure App Service.

If we select that host name, we can see the backend host header is left empty. As discussed above, this means it will default to the front-end host.
There is nothing special about the rest of the deployment.
Manual steps
Now let’s do some unfortunately necessary manual steps.
Provision front end certificate
The first thing we’ll do and the one taking the most time (a few minutes) is to register an Azure Front Door managed certificate. This is free and pretty cool to get started.
We need to keep the DNS CNAME entry pointing to Azure Front Door while we do this as the CNAME check is used again in the certificate provisioning workflow.
We’ll open the custom domain front-end. From there, we’ll click the Enabled button under Custom Domain HTTPS. We’ll leave Front Door managed as we want Azure Front Door to provision the certificate. We then click Update.
We then save at the designer screen. This will kickstart the process.
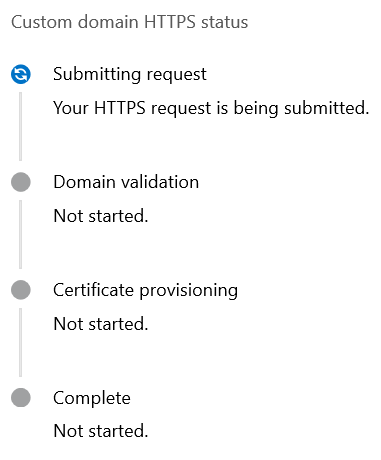
We need to wait until the four steps are green before continuing.
The screen doesn’t update itself, so we need to refresh it. This process takes up to 20 minutes.
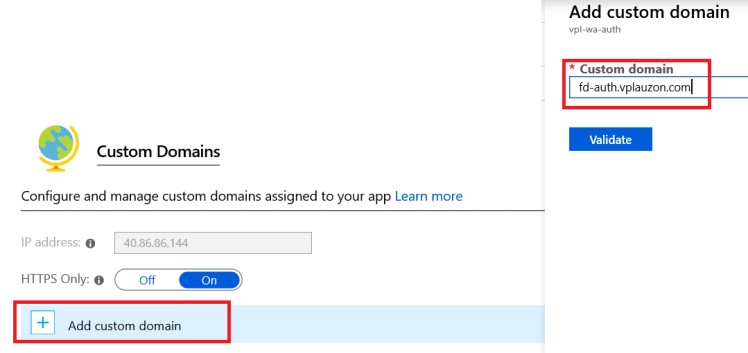
Add custom domain
Update 18-07-2019: This section could be simplified by using an alternate way to prove ownership of domain name detailed here. This allows us not to flip between CNAMEs and make the whole solution simpler but also more
Let’s open the Azure App Service application. Under Settings, let’s select Custom domains.
Let’s click Add custom domain and type our custom domain in.
Before we hit Validate, we need to temporarily change the DNS CNAME to point to Azure App Service’s domain (e.g. vpl-wa-auth.azurewebsites.net). This is only necessary during the validation process. We suggest doing that in a separate tab and simply undo it (CTRL-Z) once we validated the domain.
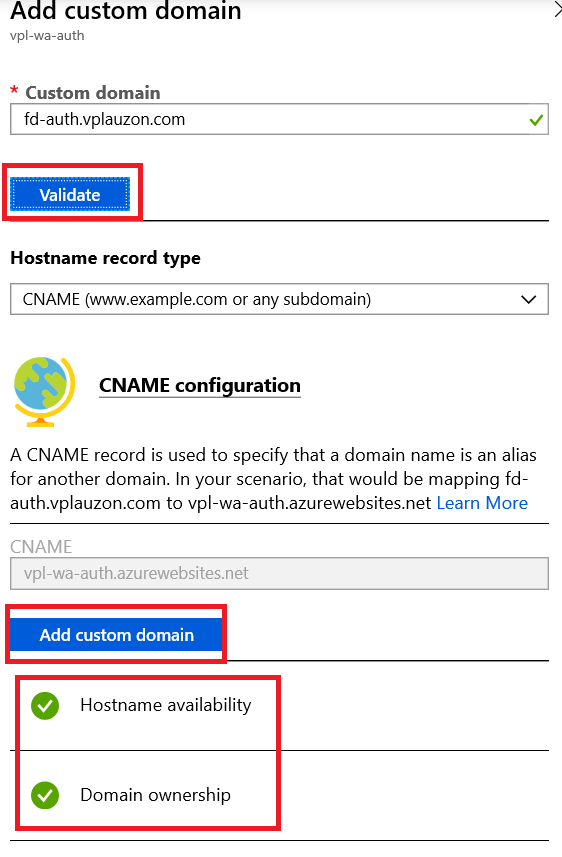
We can validate. We need to ensure the host was validated. Then we can press Add custom domain.
We’ll see there is a certificate binding error:
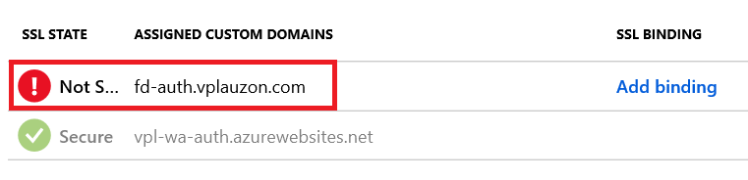
This is because we didn’t upload any certificate for that domain. This would be difficult as the certificate is bound to Azure Front Door and we do not have access to it. For a production scenario we would recommend using an external certificate and uploading it both in Azure Front Door & Azure App Service. This will prompt a few Certificate Error in the browser for us, but this is only a demo.
We can now undo the change on our CNAME record.
Add authentication
Let’s add authentication to our App Service.
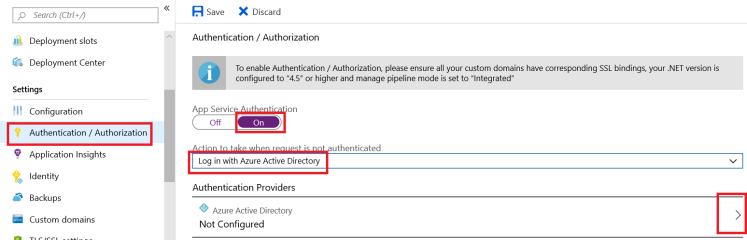
For this we need to go to Authentication / Authorization pane in Azure App Service.
We then choose On under App Service Authentication.
We then change the Action to take when request is not authenticated to Log in with *Azure Active Directory. This forces every page to have an authenticated user. It might not be necessary for every app. Many apps have an opt-in mechanism to authentication, i.e. a sign in button. But in our case, there really isn’t an app underneath, so we’ll just force authentication.
We then configure Azure Active Directory:
We’ll choose the easy was out. Let’s select Express and keep the default options.
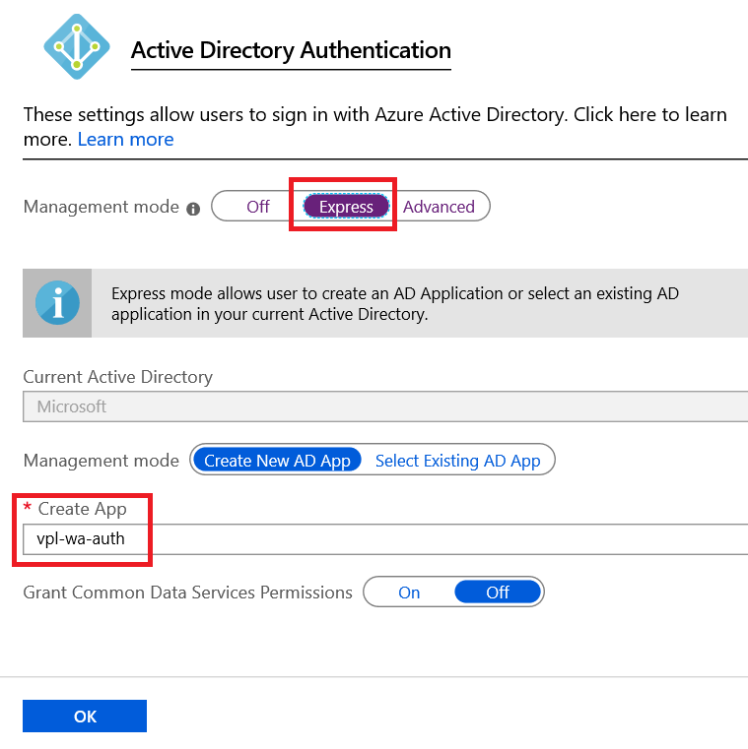
This will create an Azure AD application for us with mostly the right configuration.
We click OK.
At the bottom of the page, we’ll enter an Allowed external redirect URL:

The url should be https://CUSTOM_DOMAIN/.auth/login/aad/callback where CUSTOM_DOMAIN is our custom domain.
We then hit Save.
Testing
We’re finally ready to test. Let’s simply point our browser towards our custom domain. In our case, that’s https://fd-auth.vplauzon.com.
The browser should be redirected to something like:
(and a few other query strings)
The REDIRECT_URI place holder should be our external redirect URL (URL escaped, i.e. with %2f instead of forward slashes).
We should also be prompted with a login screen and a Permissions requested screen. If we click ok, we should be redirected to our custom domain with the content of an empty Azure App Service:
We’ll need to hit refresh a few times when we get a certificate error. Remember, this is because we never uploaded the certificate in the Azure App Service custom domain section.
Summary
We did get Azure App Service Authentication to work with Azure Front Door.
It isn’t trivial and we hope a better integration will come into the services.
Right now, quite a few manual steps need to be taken as we can’t deploy the solution in one go since we need the CNAME DNS to be pointing at different places at different times.

Hiya,
Good solution as i hit the same issue with an Web App with Azure AD integration / EasyAuth . What about if you want to host on multiple web app instance (ie to load balance / redundancy) , as you won’t be able to register the custom domain on multiple Web App instances ?
cheers
Andy
Hi Andy.
I believe you can add multiple custom domain to the same web app.
Hi,
Yes you can have multiple domains on a single web app , but i was talkin about allocating the same custom domain to multiple web apps, ie for load balancing , redundancy , which is not allowed.
Hum… are you sure?
I never tried it but we would have the same problem with Traffic Manager (TM, which is way older than AFD) with 2 Web Apps. In order to have HTTPS on 2 Web Apps load balanced by TM, you would need the web apps to be aware of the custom domain and its certificate.